" Web-based Email Setup"
NeoMail (Web based eMail utility)
Send and receive email directly through your browser. NeoMail is a Web-based email reader
with advanced features such as sending/receiving messages with multiple attachments and an
online image attachment display.
On this Page
Installing NeoMail
- Make sure the Perl ValueApp is installed.
- Go to your VDS Manager (http://yourdomain.com/manager/), click on
ValueApps, and click on the Collaboration tab.
- Under the Available ValueApps list, click the Neomail ValueApp icon.
- Agree to the license.
- Enter the following information:
Language - Select a language.
Max Address Book Size - This is the maximum size (In KB) that a user's address
book can grow to. This prevents a user from using too much of your hard drive space.
Recommended - 10000
Folder Quota - Once a user's saved email messages meet or exceed this size (in
KB), no future messages will be able to be sent to any folder other than "TRASH",
where they will be immediately deleted, until space is freed.
Recommended - 10000
Attachment Limit - This is the limit on the size of attachments (in MB). Large
attachments can significantly drain a server's resources during the encoding process.
Recommended - 4

|
| This affects outgoing attachment size only and
will not prevent users from receiving messages with large
attachments.
|
|
Session Timeout - This indicates how much time (in Minutes) can pass before a
session is considered timed out and the user needs to log in again. Make sure this is
big enough that a user typing a long message won't get logged out automatically while
typing.
Recommended - 30
Number of Headers - This indicates the maximum number of headers to display to a
user at a time. Keep this number reasonable to ensure fast load times for slow
connection users.
Recommended - 10
- Click the Next button.
- Click the Finish button.

Logging into NeoMail
- Go to: http://yourdomain.com/mail/.
- Log in using the username and password for the email account you wish to
check. If you want to check the "sales" email box, enter "sales"
as the username. Then, enter the password for the "sales" email
account.
Setting up your NeoMail Preferences
The first time you log into Neomail for a particular email address, you will need
to set up your preferences. You can also edit your preferences by clicking on
the wrench icon at the top of the Neomail program window. Each individual email
account can set up their own preferences.
- Enter the following information:
Language - Select a language.
Real Name - Enter the name that people will see when they receive an
email message from you.
From - Enter the email address to which you want people to send
replies.
Style - Choose a theme for your Neomail interface.
Default sort - Select the order that you want your email messages to
be displayed.
Messages per page - Select the number of messages to display per
page.
Default headers - Select the type of email headers you wish to
display.
Signature - Delete the default text or enter a message which will be
attached to all emails sent from the account.
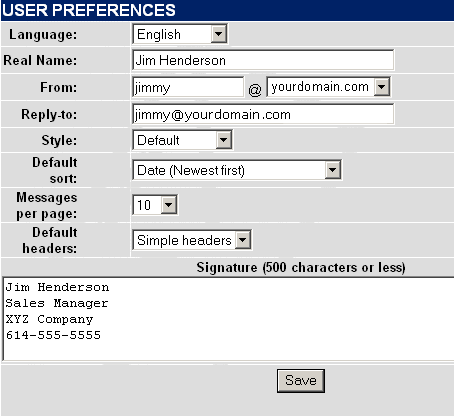
- Click Save.
Your NeoMail Trash Can
Emptying the NeoMail trash can for an email account can free up space on your VDS
hosting account.
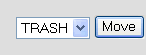
Sending Mail to the Trash Can
- Log into Neomail.
- Check the boxes next to the emails you wish to send to the trash.
- Make sure the Location drop down menu says "trash" and click the
Move button.
Emptying the Trash Can
- Log into Neomail.
- Click the Empty Trash
 image. image.
|
|